If at first you already have a blog created for free on the
Blogger platform for example with the name "yourname.blogspot.com"
then because you want to display your new domain name without the need to buy
or move free hosting on the Blogger then what steps do you need to do it?
Minimize your Blogger account page first and then log in to the hosting account where you purchased the domain.
Minimize your Blogger account page first and then log in to the hosting account where you purchased the domain.
To realize this desire, you must do what is referred to as a
"custom domain". For example, I have created a blog on blogger with
the name "tutorialpedia360.blogspot.com" and then I want to replace
or custom domain with a TLD domain name that I bought myself (for example
"tutorial-pedia.com") then the steps to do are as the following:
Login to the Blogger account where the original blog was created,
then enter the "Settings - Basic" menu. In the "Publishing"
section there is still an address of the existing blog
("tutorialpedia360.blogspot.com"), then click on "+ Set up a
third-party URL for your blog".
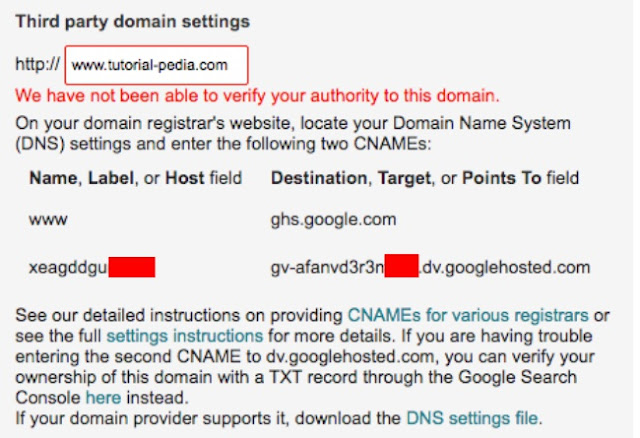
Enter the new domain name that you have purchased (must be with
the "www" prefix), for example, "www.tutorial-pedia.com".
Click "Save" to save changes.
An error message will appear in red letters, "We have not
been able to verify your authority to this domain". Do not panic !. This
is a normal error message. You only need to copy the 2 (two) codes or
parameters that appear below it, namely the lines "www" and
"xeagddguxxxx" along with the data "Destination, Target, or
Point To" that is "ghs.google.com" and
"gv-afanvd3r3nxxxx.dv.googlehosted.com ".

Next, enter the "Manage DNS" menu. Here you have to add
"A records" with your newly purchased domain name along with 4 (four)
different numbers or values namely 216.239.32.21, 216.239.34.21,
216.239.36.21 and 216.239.38.21 (which is the default IP Google). Do 4 (four)
times inputting with the same "Name" parameter but the
"Value" is different. Leave the "Priority" column blank.

Then just add 2 (two) "CNAME records". First, enter the CNAME record for "www" with "Destination" in accordance with the data that appears in your Blogger account "ghs.google.com". Then click "Add Record". Then repeat adding the second "CNAME records" to "xeagddguxxxx".

Now the changes have been made to the "Manage DNS" menu. But the work is not finished. In order for the custom domain to work properly, on the hosting account where you purchased the domain, it is necessary to first change the nameservers.
Click the "Nameservers" menu then select "Use other
nameservers (enter below)", for example on the hosting that I used to buy
a domain, the nameservers used to support custom domains are
"ns1.idwebhost.id" and "ns2.idwebhost.id ". If it has been
replaced, click "Change Name Server". Nameserver modification status
information will appear where the effectiveness of the results takes from several
minutes to several hours to be resolved.

After waiting the amount of time (roughly takes at most 24 hours), the last step you need to do is repeat the custom domain process in your blogger account in the initial steps. If there are no input errors and the propagation time is complete, no more error messages will appear.

After waiting the amount of time (roughly takes at most 24 hours), the last step you need to do is repeat the custom domain process in your blogger account in the initial steps. If there are no input errors and the propagation time is complete, no more error messages will appear.

Finally, select the redirect from "non-www" to "www" by clicking "Edit" to give a "check" mark on the "Redirect yourdomain.com to www.yourdomain.com" option. Click "Save" to save changes.

Now you can see in the browser when you type in a new domain it will immediately appear in the browser. The next work is to add the new domain as a new property in GSC (Google Search Console).

0 Komentar
Write your comments